Lightroom presets are a critical part of any photographer’s workflow. Whether you’re an amateur or a professional, a preset system gives your image editing a good starting point and a consistent look.
With the launch of our new Landscape Photography Lightroom Presets, we’re going to be diving deeper into photo editing, and in particular, Lightroom editing. To get started, here’s a complete guide on how to install Lightroom presets. You can use these instructions to install our Lightroom presets or any other Lightroom Presets you’ve downloaded or purchased from other companies. In this article, we’ll cover the following:
- How to Install Lightroom Presets in Lightroom Classic (versions 7.3 and newer)
- How to Install Lightroom Brushes (Local Adjustments)
- How to Install Lightroom Presets on Older Versions of Lightroom
- Lightroom Installation FAQs and Common Errors
Installing presets in Lightroom Classic
These installation steps are for users of the latest versions of Adobe Lightroom Classic, version 7.3 or later. For older versions of Lightroom, skip to the next section.
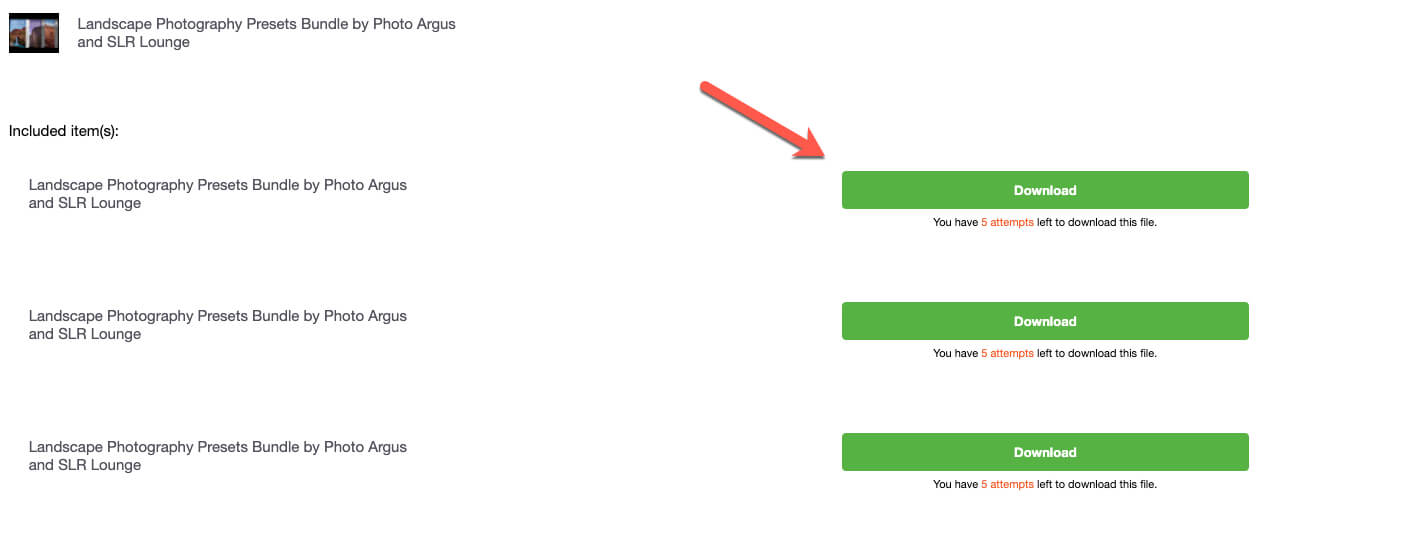
- Download the ZIP files for your purchased presets. Below is a screenshot of what the download process looks like for our set of presets. If you purchased your presets from another company, find a way to download the files and remember your download location, which we’ll use later.

- Open Lightroom Classic.
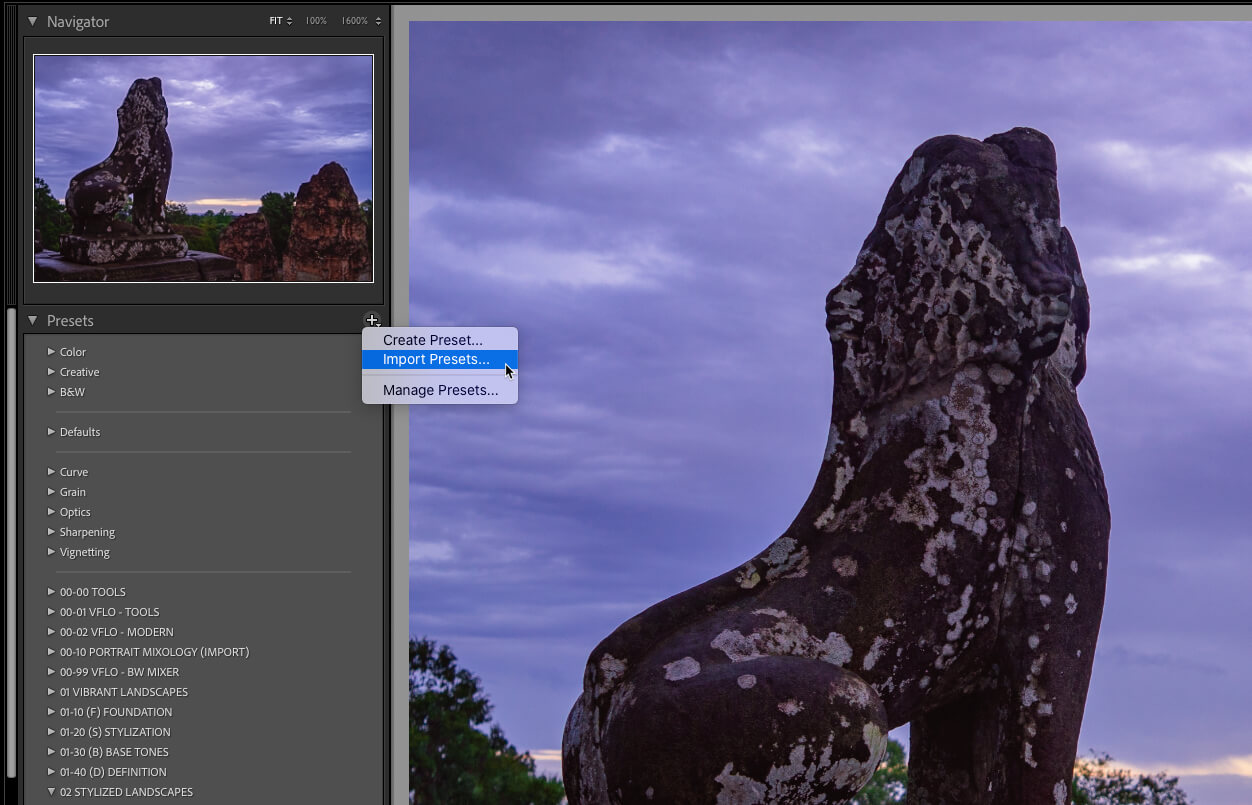
- Go to the Develop module (press “D” on your keyboard as a shortcut).
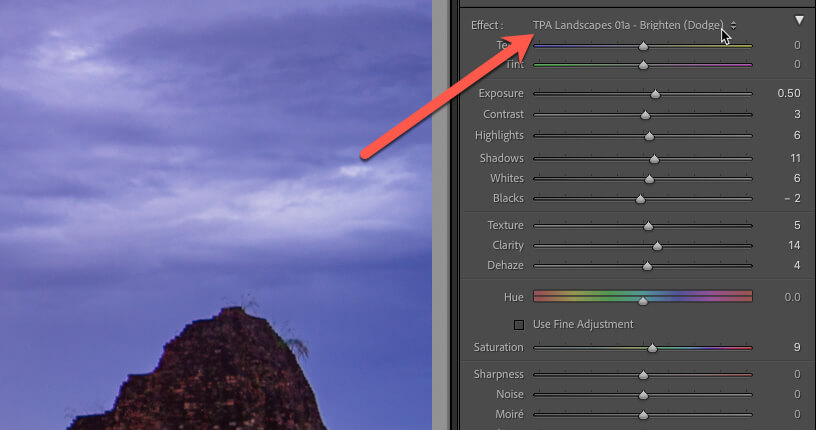
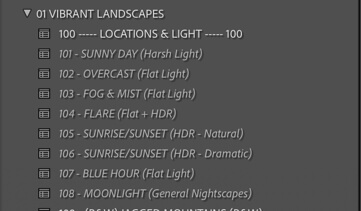
- Look for “Presets” in the left column (see the image below)
- Click on the + icon at the top right of the presets section and select “import presets”

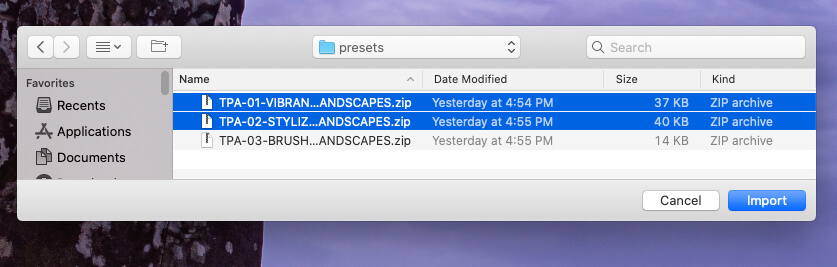
- Find the ZIP files called “TPA-01-VIBRANT-LANDSCAPES.zip” and “TPA-02-STYLIZED-LANDSCAPES.zip” that you downloaded in step 1 and click Import. Do not select the Zip file for the Brushes called “TPA-03-BRUSHES-LANDSCAPES.zip” yet. Brushes will need to be installed by another method, which we review down below.

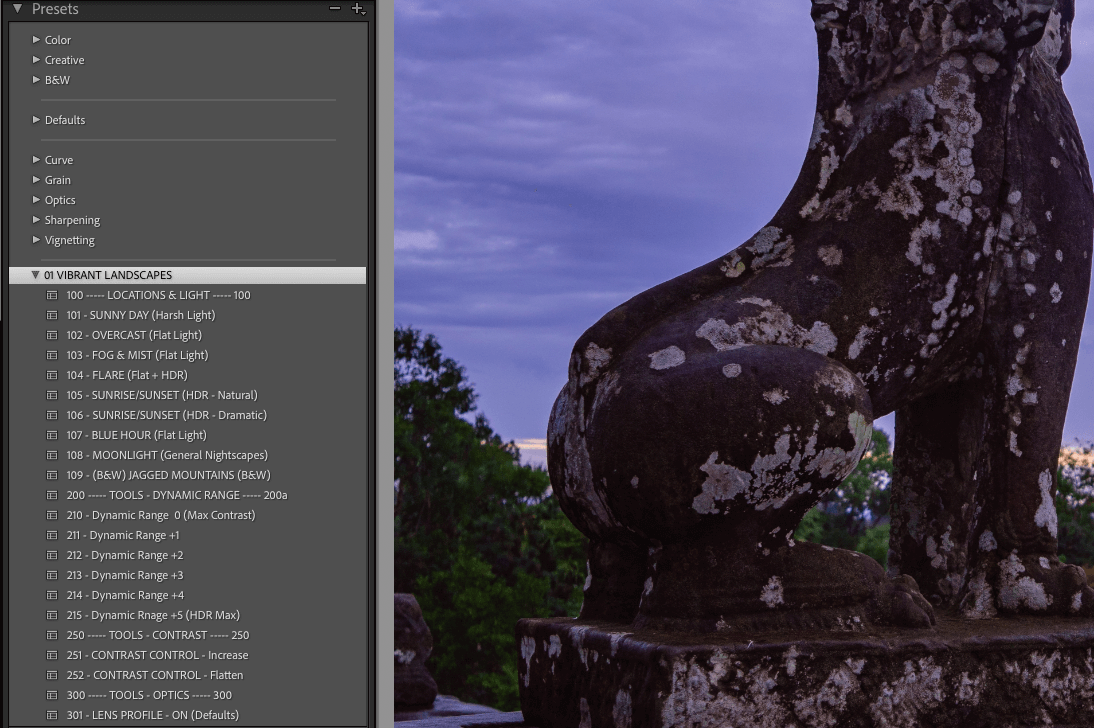
- Check to see if you did this correctly. If so, you should see all of your presets listed in the presets section. If not, try the steps again.

How to Install Brushes (Local Adjustments) in Lightroom
- Download the brushes that you would like to install
- Open Lightroom
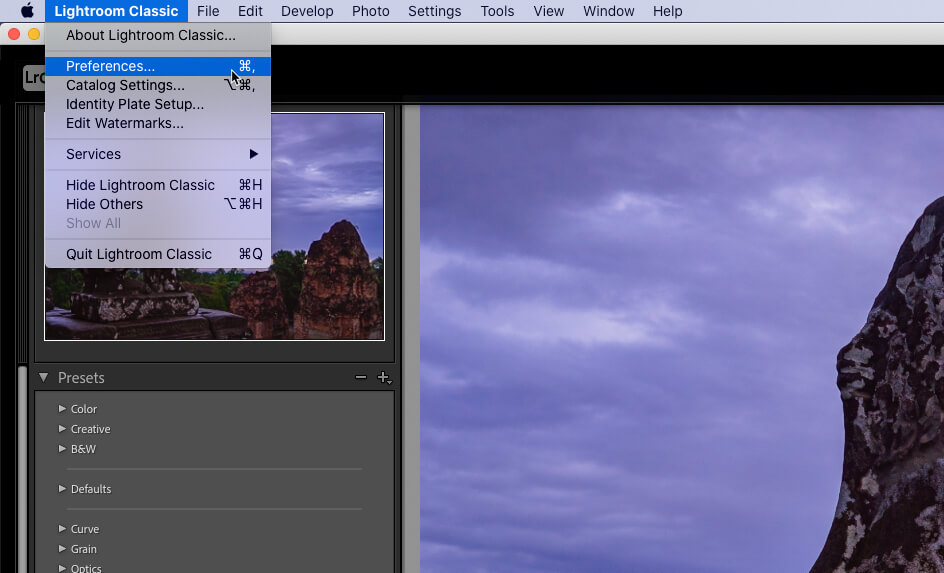
- Open Preferences (see below)

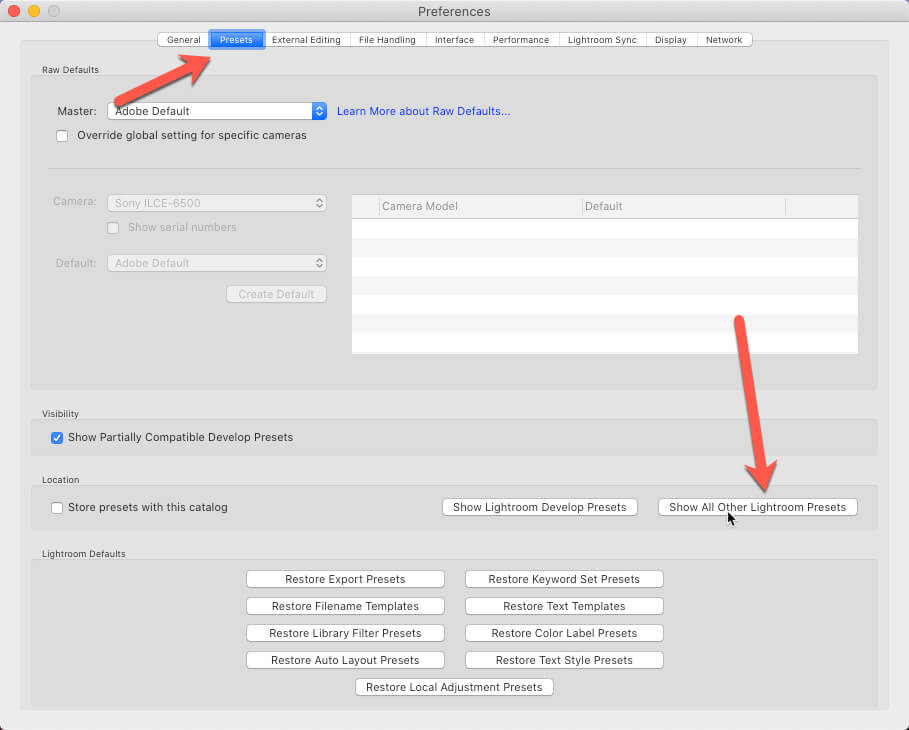
- Select “Presets” and “Show All Other Lightroom Presets” as you see in the image below.

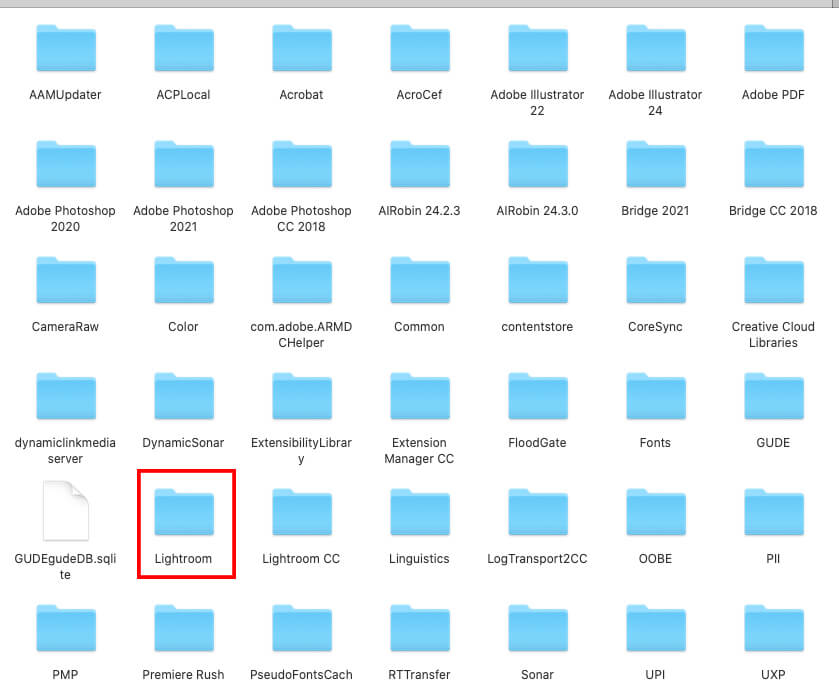
- Click into the folder called “Lightroom”

- Then Click on the folder called “Local Adjustment Presets” and drag in the unzipped folder of your brushes. IMPORTANT: Be sure that your folder is not zipped!
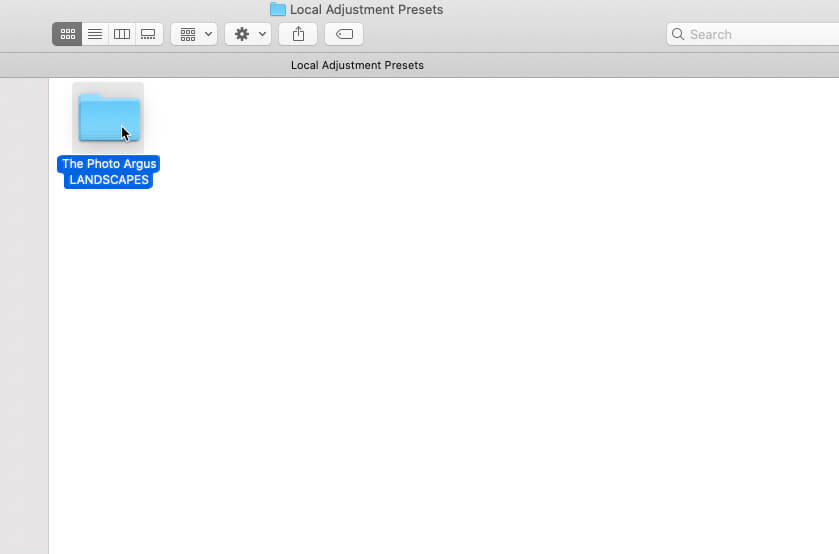

- Restart Lightroom and check to see if the presets are there. If so, you should see something like the image below. If not, repeat the steps above.

Installing Lightroom Presets on Older Versions of Lightroom
If you have an older version of Lightroom, we highly suggest upgrading. If you would like to stay with an older version of the software, such as Lightroom 4, 5, 6, or pre April 2018, Version 7.3 Lightroom Classic/CC follow these instructions.
- Download the presets
- Unzip the file with the presets that you downloaded
- Open Lightroom
- Click on Preferences and find the Presets tab
- Click “Show Lightroom Presets Folder“
- Click into the Lightroom folder
- Click on Develop Presets folder
- Copy the unzipped folder (from step 2) into the Develop Presets folder (from step 7)
- Restart Lightroom and you should see the presets!
FAQs and Common Errors
Q: Why are my presets not appearing in Lightroom?
A: Your Photo Argus presets may not be appearing in Lightroom due to one of the following reasons:
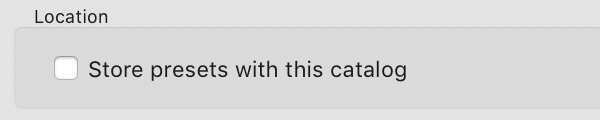
(1) Please check your Lightroom preferences (Top menu bar > Preferences > Presets > Visibility). If you see the option “Store presets with this catalog” checked, you need to uncheck it.
(2) With the latest Adobe updates, Adobe automatically hides presets that are missing profiles.
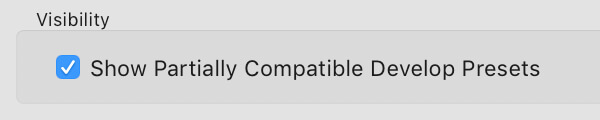
For Lightroom Classic CC 8.1 and later, please check your Lightroom preferences (Top menu bar > Preferences > Presets > Visibility). If you see the option “Show Partially Compatible Develop Presets” unchecked, please check it for your presets to appear.
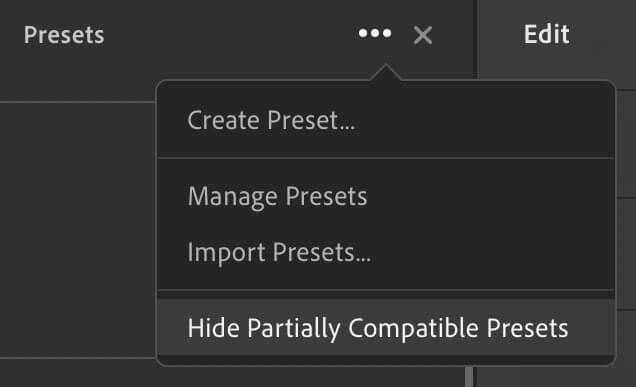
For Lightroom CC 2.02 and later, please go to the “Presets” panel and click on the 3 dots to reveal a dropdown menu. Please uncheck “Hide Partially Compatible Presets” for your presets to appear.
Q: Why are my presets greyed out?
A: Lightroom presets will appear in italics and be greyed out when the presets are only partially compatible with the image you currently editing. The most common scenario is when you are editing JPG or PNG images and the presets are designed for RAW processing. In many cases, the presets will still work just fine.
If you are editing raw images and a preset is still greyed out, it may be because the Adobe profile is not available for the raw files from your camera. All TPA presets currently use standard Adobe profiles that are compatible with all cameras that Lightroom can edit!
Q: On which apps can I use Photo Argus presets?
A: Below, please find the software compatibility specs for the Photo Argus presets:
- Adobe® Lightroom® 4 or later
- Adobe® Camera Raw CS6 or later
- Adobe® Lightroom® CC Desktop 1.4 or later and Mobile
Q: How do I buy Lightroom and how much is it?
A: Find more information on how to buy Lightroom here.
Q: Can I share my presets with other users?
A: Sharing presets with other users is strictly prohibited and is considered software piracy. Sharing is trackable. All verified instances of sharing will be reported to the proper authorities and legal action will be taken to the fullest extent allowable by law.
Q: How many computers can I install my presets on?
A: Each Photo Argus license is for a single user, although presets may be installed across 2 computers (as long as they are for that single user). Please contact us at customerservice@thephotoargus.com should you need to install your Photo Argus presets across more than 2 machines.
