When you discover the world of Photoshop, you’re undoubtedly eager to try out every tool in your palette. At first, it’s quite difficult to establish the fine line (and not cross it) between that perfectly edited image and one that’s gone too far – it’s a balancing act which can take a some time to master.
The truth is simple – there’s no hard and fast rule to photography as everyone produces unique work at entirely different levels. The same rule applies to editing – what one photographer considers an over-edited photo can look absolutely beautiful to another.
While the amount of editing you do depends on your personal taste, there are some general rules to follow to make sure that you don’t fall into the habit of damaging your image. Below are three typical red flags that you’ve pushed the editing limit in your digital dark room.
In order to understand what these pitfalls are and how to avoid them, you need to know what your histogram is AND how to use it. This histogram article explains the importance of this often-overlooked tool.
1. Pushing the Tonal Range
Adjusting your tonal range – that is, increasing or decreasing the amount of black/white in your image – is a common editing technique. It can take a flat, cloudy image and instantly turn it into a high-impact photo full of color and intrigue. But if you go too far, you’ll lose a lot of detail.
When you adjust your tones, you typically use the levels adjustment layer to do so. In short, this tool increases or decreases the amount of black/white in your image – also known as the tonal range. While this applies to both b/w and color photos, It’s easier to see the changes in tonal range when looking at a black and white image as you’re not distracted by adding colors to the mix.
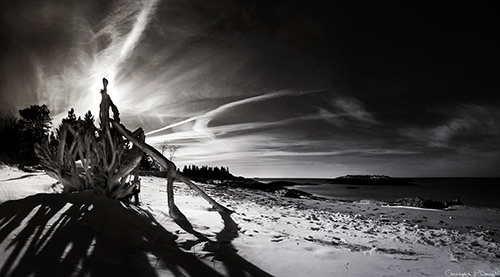
Some things are easier shown than explained, so let’s look at a photo with a good tonal range and its histogram.


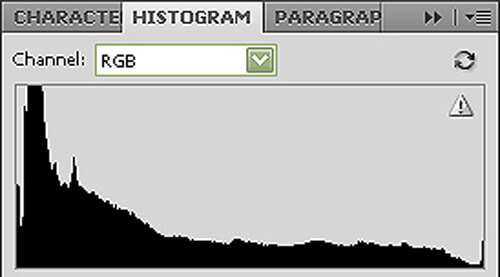
The histogram above shows an image that has no damage – that is, the left side and right side have a very small spike and there are no gaps in between. This is what most photographers like to see when editing their image.
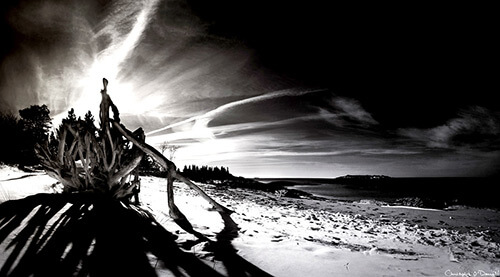
However, I may want to increase the tonal range, adding more whites and darks to those pixels that are in the grayish area. Let’s adjust the levels and see what we can do to bump up the contrast.


The photo may look more dramatic, but there’s an unnatural look to it….one may look at this photo and go “Well, I know it looks horrible, but what exactly is bad about it?”
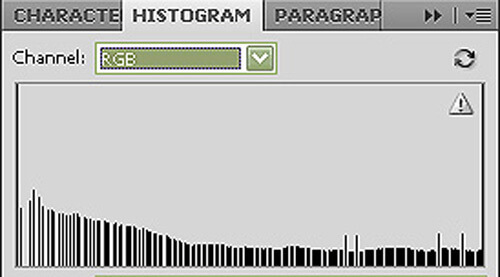
Let’s look at the histogram for a moment and compare it to the original – what was once a very full histogram with a good spread of tones now has data completely missing. This is called “breaking pixels” and is generally a bad thing to do.
The short version – instead of increasing the tonal range, all I did was turn those gray pixels (blacks that had some degree of white in them or vice versa) into either 100% black or 100%white pixels – eliminating the variation instead of increasing it.
Not only did we delete a good
chunk of our photo, but we now have what are called blown highlights and blocked shadows – this is a direct effect of a poor tonal range and another sign of bad editing.
2. Blown Highlights and Blocked Shadows
Remember, when you have a spike on your histogram at either end, it means you’ve blown a highlight (overexposed your image) or blocked a shadow (underexposed your image). The higher the spike, the more damage is done to your photo.
Blown highlights are simply those pixels that are now 100% white, and blocked shadows are pixels that are 100% black – both being damaged beyond the point of bringing them back. Again, this can affect both b/w and color photos but are easier to spot with a b/w image.
Usually, we’re not always able to tell whether or not we’ve blown a highlight outside of RAW – the histogram can tell us this in an instant, and to what extent the damage is.
Why is this a sign of bad editing?
1. You’ve now got these very distracting areas in your photo that completely change how your viewers look at your image.
2. By replacing these pixels, you’ve now lost a great amount of detail in your photo to the point of an unnatural appearance.
3. If you have a defined area of over or underexposed pixels, it will look absolutely horrible when printed.
There are, however, artful ways to blow out your highlights – just make sure the transition is soft and gradual, and that there’s a certain benefit to your image.
Josef Hoflehner is a perfect example of when blown highlights are used artistically. Most of his images have some degree overexposed areas, but they actually benefit his black and white images by making the darker areas pop. Without these blown-out areas, I don’t think his photos would be as powerful as they are now.
So my point is – unless there’s a good reason for that spike on either end of the histogram, tone it back to the middle.
3. Oversaturation
When working in color, you can easily oversaturate the image to a point where some serious photodamage can take place. It works in the same way as blown highlights and blocked shadows do – you completely lose tonal range, detail, and instead have a blob of color.
For example, let’s look at the photo below before any saturation adjustments:

Now after:

You may (at first) think about what fantastic colors this photo has in the sky compared with the original. However, something looks a bit off – and it’s not just the unnatural coloring.
What happened to the detail? It looks a lot like what happens when you over/underexpose an image…the detail is lost and replaced with colored pixels with no tonal range – not an ideal situation and an obvious sign of photodamage.
Using your histogram when editing is extremely important because you can instantly tell if you’ve over-edited your image. This is especially important in color because the damage may not always be so obvious as it is when working strictly with tones. The histogram allows you to check your photo in an instant for blown highlights, blocked shadows, or missing tones (breaking pixels).
Can you still edit your image without damaging it unnecessarily? Absolutely!
Editing in RAW Format
There are many great reasons why to shoot in RAW format, and you can find a detailed technical explanation of that by clicking the above link – a very interesting read indeed.
However, if you’re anything like me and are looking for the short version – editing in RAW gives you more data to work with. Whenever you edit your image, you are (on some level) damaging, altering, and otherwise messing with the pixels of your original photo. This can take its toll on your final image.
When you shoot in RAW format, you’re preserving as much data as possible. Using the same logic – if you edit in RAW format first before importing into Photoshop, you’re also editing with as much data as possible. So the more data you work with, the less apparent any damage to your photo will become.
How I Edit My Images
A fantastic piece of advice I got a few years ago is that when you’re done editing your photo, undo the last step you did and it will look perfect. What this means is that we can get so caught up in the editing moment that we fail to see how far we’ve progressed (or damaged) our image. The best thing you can do is take a break and come back to your photo with a fresh mind and blank canvas – I’ve done this many times before and it’s helped direct me down the right path every single time.
Photographers often ask me what is the most important step in editing my images and are often disappointed by my response, hoping to hear about some secret Photoshop workflow. The most important step – hands down – is to take a photograph that is strong on its own and does not NEED to be edited. Most of your photo enhancements can be done in-camera before it even makes it to your computer, and does not compare to anything you can pull off in the darkroom.
If you find yourself editing your images in order to correct them, and not enhance them, go back in the field and try again. Identify what you’re trying to improve and then research how to accomplish this – not only will you feel like a more knowledgeable photographer, but you’ll also produce images of higher quality.
