HOME
  • Home
  • About
  • Contact
  • Contribute
  • Subscribe
  • Twitter
  • Flickr
 

Tutorials

2

How to Apply a Custom Lens Vignette in Photoshop

by Christopher O’Donnell


Share

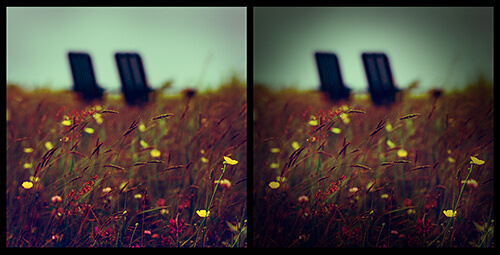
Achieving a lens vignette in-camera is not always an option. Even then, the effect you were striving for might not turn out the way you had imagined. Unfortunately, you can not manipulate authentic lens vignettes to conform to your specific photo…or can you?

When post processing your image in Photoshop – especially if it is a portrait – adding a custom lens vignette that compliments the highlights and shadows of your photo is an invaluable skill to add to your Photoshop tool belt. Below is a very simple, quick, and entirely customizable way to apply the dramatic atmosphere a lens vignette provides to any photo you choose.

1. A vignette should always be added to your image at the end of the editing process. If you decide to crop your photo differently or alter the colors, the vignette would most definitely get in the way of that.

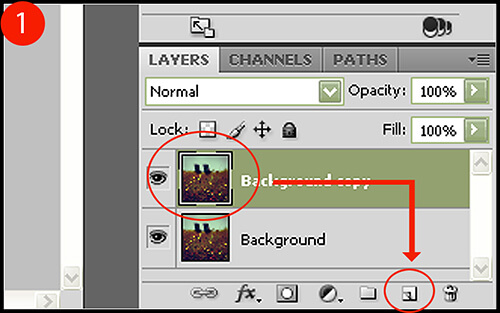
With that in mind, open your image in Photoshop and duplicate the layer by clicking Layer > Duplicate so that you still have your original layer to revert back to if necessary. You can also do this quickly by clicking on your layer thumbnail and drag-and-dropping it over the “add a layer” icon located on your layers palette toolbar (Figure 1).

Lens Vignette in Photoshop

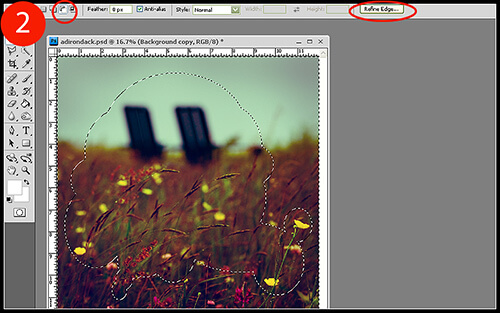
2. With your new layer selected, press CTRL + A to select the entire canvas. Now click on your Oval Marquee selection tool , and with the “subtract from selection” option selected in the toolbar at the top of your screen (Figure 2), start to select – or should I say, deselect – the areas you wish to remain unaffected by the vignette. Most certainly the entire center area should be deselected, but depending on your photo and what elements you want to keep perfectly lighted, expect to have a very uneven and rather odd-looking selection path when you’re finished. The key here is to remember that a lens vignette does not have to be a uniform oval – you can manipulate the perimeter and strength of the vignette any way you choose.

When finished, click on the Refine Edge button located in the top tool bar for the Marquee tool.

Lens Vignette in Photoshop

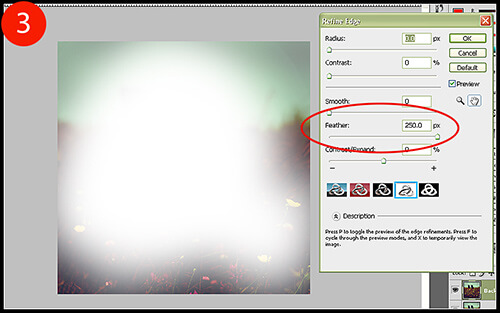
3. Under the Refine Edge window, increase the feathering to create a very gradual and soft selection. For this example, I increased the Feather to 250 for a fully-feathered area. Click OK when finished.

Lens Vignette in Photoshop

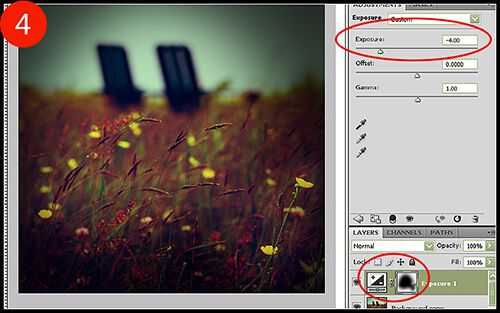
4. We are now going to add an Exposure adjustment layer so that we can decrease the exposure on the areas we just selected (which is why we were using the “subtract from selection” marquee tool). Click Layer > New Adjustment Layer > Exposure, or just click on the Exposure icon in your adjustment layer palette.

Decrease the exposure enough so that you cast a dramatic and pleasing lens vignette. For this example, I underexposed the selected areas by four full stops.

Lens Vignette in Photoshop

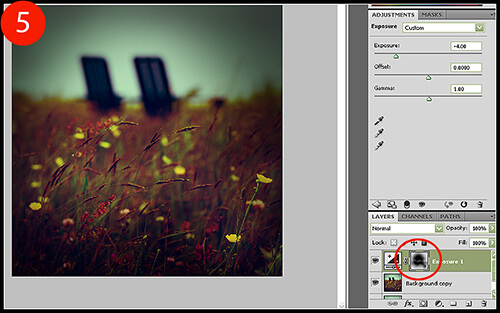
5. To further our vignette customization, you can utilize the layer mask that was applied to your Exposure adjustment layer automatically. To either remove or add the vignette to areas in your photo, click on your Brush tool and set the foreground color to black for removal, or to white for addition. With a soft brush (one with 0% Hardness) set to an Opacity level of around 10% to start, begin to brush the areas you wish to affect (Figure 5). In this example, I removed some vignetting from the singular yellow flower in the bottom right-hand corner of the photo, and also from the sky as it seemed to be too sharp of a transition originally.

Lens Vignette in Photoshop

Shooting conditions can be very fast-paced and stressful, and you most certainly have enough techniques to remember on the fly without having to perfect a lens vignette that you’re essentially stuck with. A fully customizable – and removable – lens vignette is the perfect finishing touch that adds a sense of drama to your final image.

Lens Vignette in Photoshop

Christopher O'Donnell Christopher O’Donnell is a professional landscape/portrait photographer who lives on the coast of Maine. When not scouting for new locations or spending time with
his “sons” (his two yellow labs), he is a freelance writer who authors photography course work.

Website: christopherodonnellphotography.com

Related Posts

If you found this article helpful, check out...

  • Master Realistic Eye Editing in Photoshop


  • Authentic Grainy Photoshop Effect for Your Black and White Photos


  • Combining Images to Create an Antique Look in Photoshop


  • Dodge and Burn to Correct Exposure


  • How to Achieve Porcelain Skin with Natural Airbrushing in Photoshop


Subscribe to Our Feed Subscribe by Email Follow Us On Twitter Become a Fan

2 Comments

  • Dan Milham

    December 15th

    Very nicely explained, both how and why.

  • canon5dphoto

    January 4th

    Thanks for posting this. I had just been using the lens correction dialog but this looks interesting and more flexible.

Leave a Reply

Never Miss a Thing at TPA

Keep up-to-date with tips, resources, and inspiration for photographers novice to pro.
Subscribe to Our Feed Subscribe by Email Follow Us On Twitter Become a Fan

Search

Topics

  • 101
  • Challenge
  • Freelance
  • Inspiration
  • How To's
  • Tips
  • Resources
  • Freebies
  • Updates
  • Photographers
  • Tutorials
  • Tools
  • Gear
  • DIY

Recent Articles

  • How to Paint with Light in a Photograph
  • 35 Examples of Amazing Tilt Shift Photography
  • Photography Tips – Shooting County Fairs
  • The Wix.com Premium Photography Website Giveaway
  • 24 Amazing Photoshop Actions to Help You Achieve a Retro Look
  • Looking Up: A Photographer’s Tribute To Trees
  • 20 Useful Photoshop Actions to Make Your Post Processing Easier
  • Showcase Challenge: A MidSummer’s Night Dream
  • Specialize In: Commercial and Advertising Photography
  • 42 Awe Inspiring Photos of Extreme Weather
  • Get Exposed: User Submitted Showcases
  • 20 Photoshop Lighting Effects Tutorials for Image Enhancement
  • Specialize In: Architectural and Industrial Photography
  • fotoflōt Magnetic Mounting System Giveaway
  • Specialize: Outdoor and Adventure Photography
  • Premium WordPress Themes to Help Your Portfolio or Photoblog
  • $50 Giveaway from Next Day Flyers
  • 30 Adorable Examples of Baby Photography
  • Choosing Areas of Specialization in Digital Photography
  • Field of Dreams – 30 Amazing Photographs to Leave You Inspired
  • Understanding Freelance Photography
  • 30 Inspirational Examples of Fashion Photography
  • 30 Wonderful Photos of Windmills From Around the World
  • Crude Awakening – A Photographic Series by Jane Fulton Alt
  • Helpful Tools for Creating, Sharing and Discovering Lighting Diagrams

TPA Community Portfolio

    GustavoDiego AraújoAstraRed star of the gardenIMG_0544The Red DoorsWay to Kunming (Via Xi'an)Friends

    Share your work here!

Recent Posts

  • How to Paint with Light in a Photograph
  • 35 Examples of Amazing Tilt Shift Photography
  • Photography Tips – Shooting County Fairs
  • The Wix.com Premium Photography Website Giveaway
  • 24 Amazing Photoshop Actions to Help You Achieve a Retro Look

Recent Comments

  • Most of them r fake, tilt shifted in post. Do...
    Angel
  • Awesome photos. Here are two of my attempts: http://gooddaysbetterdays.tumblr.com/post/869710862/somewhere-on-dingle-peninsula-ireland-summer-of http://gooddaysbetterdays.tumblr.com/post/837953418/beach-near-caherdaniel-ireland-summer-of-2010...
    Thomas
  • My attempt using a pic my wife took at the...
    Nunya
  • Here is a great video put together using tilt-shift style...
    Justin

About

The Photo Argus is a resource for photographers novice to advanced. We bring you useful information, inspiration, technique, photographer showcases and more.

Be a Contributor
Do you have a photography technique or tip to share? We would love to here about it. Please feel free to contact us to find out how to become a contributor.

Background Image By - Rob Walker


© Copyright 2010 The Photo Argus