HOME
  • Home
  • About
  • Contact
  • Contribute
  • Subscribe
  • Twitter
  • Flickr
 

Tutorials

2

Dodge and Burn to Correct Exposure

by Christopher O’Donnell


Share

When viewing your image in post process, you may notice that some areas are perfectly exposed while others fall outside their ideal exposure. Since we can not expose every part of a photo perfectly, we have the Photoshop Dodge and Burn tools at our disposal which help us selectively correct the exposure in the form of a brush tool.

The Dodge tool is what you use to increase the exposure on sections of your photo that you draw on (make them lighter), while the Burn tool will the decrease exposure (darken an image). In Photoshop, you can choose to have either the highlights, mid tones, or shadows of an image dodged or burned. For example, if you took a shot of the ocean with the sunlight reflecting off of the ripples in the water and you would like to decrease the brightness of the reflections, you would select the Burn Tool (to decrease exposure) and select Highlights so that it only decreases the exposure on the bright reflections.

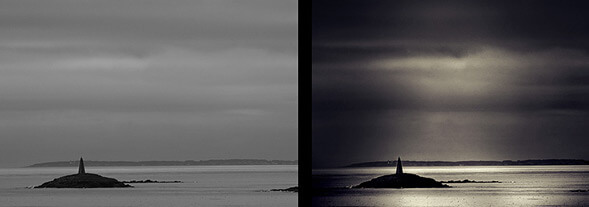
The image I chose for this example is one that is very flat in tonal range, as you can clearly see. It was taken during overcast lighting, which produced an unremarkable gray sky and water. Using the Dodge and Burn tools, we are going to selectively increase the tonal range of the image, as well as the overall interest and depth.

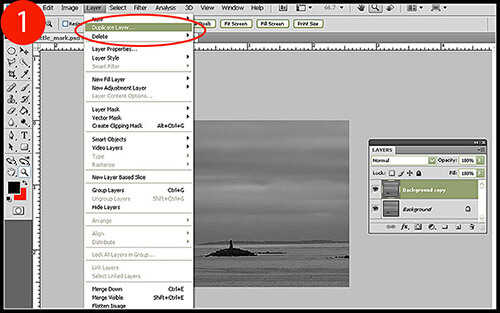
1. The first thing to do is to duplicate our base layer so that we have the original image to revert to if necessary. Click Layer > Duplicate Layer to add an additional layer (Figure 1).

Dodge and Burn to Correct Exposure

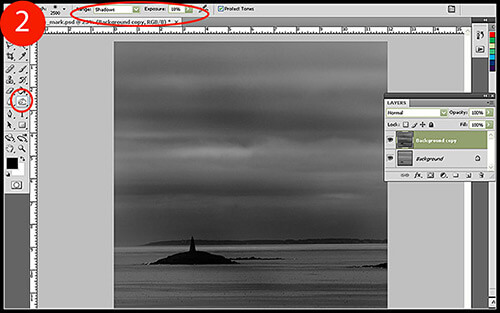
2. Select your Burn tool and right-click to bring up the Burn tool brush menu. Set the Hardness level to 0% and select a brush size appropriate for the area you want to affect. Now go to the Burn tool menu at the top of your screen and set the Range to Shadows, as we only want to burn the darker tones initially to increase the tonal range of the image. Start with an Exposure setting of 10%, and then readjust when necessary.

Begin to brush over the areas you want to darken and continue to pass over them until the desired effect has been reached. Notice how the highlights essentially stay unaffected, while the darker tones are burned quite noticeably (Figure 2).

Dodge and Burn to Correct Exposure

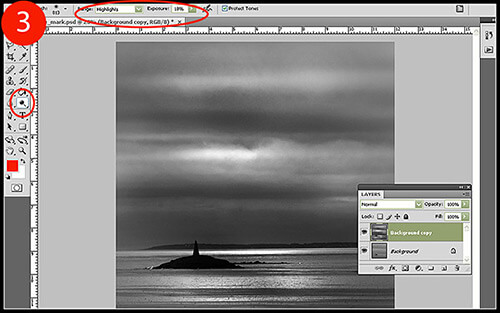
3. Right-click on your Burn tool to reveal the Dodge tool, then select it. Set the Dodge tool brush to the same parameters as you did to your Burn tool : a Hardness level of 0% and a brush size that will fit the area you intend to lighten. Return to the top of your screen and adjust the Dodge tool menu so that the Range is set to Highlights, so that we are only lightening the light tones of the image. As we did previously, the Exposure should be set to 10% initially, then adjusted depending on how strongly the Dodge tool affects your photo.

When brushing over the areas you wish to lighten, take care not to overexpose – or blow out – the highlights, as that can become highly distracting to those who view your image.

Dodge and Burn to Correct Exposure

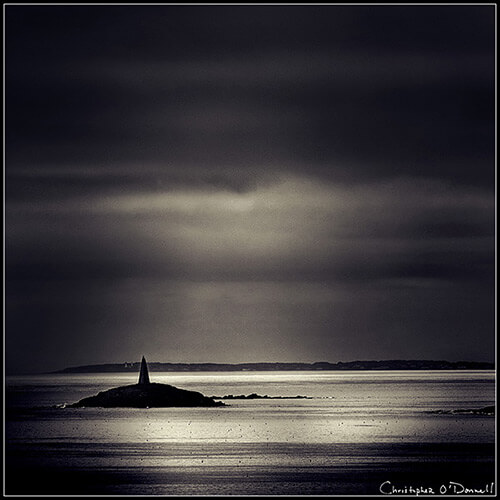
With a little more precision dodging and burning, and a few adjustment layers, the final result is much more dramatic than the original:

Dodge and Burn to Correct Exposure

The Dodge and Burn Tools are incredibly versatile, and with the right combinations of opacity and range, you can dramatically change the lighting effects and overall exposure of the entire image. The next time your image comes out with flat, uninteresting lighting and tones, try using a complimentary combination of the Dodge and Burn tools and see what you can come up with.

Christopher O'Donnell Christopher O’Donnell is a professional landscape/portrait photographer who lives on the coast of Maine. When not scouting for new locations or spending time with
his “sons” (his two yellow labs), he is a freelance writer who authors photography course work.

Website: christopherodonnellphotography.com

Related Posts

If you found this article helpful, check out...

  • Curing Blown Highlights with RAW


  • How to Apply a Custom Lens Vignette in Photoshop


  • Master Realistic Eye Editing in Photoshop


  • Authentic Grainy Photoshop Effect for Your Black and White Photos


  • Combining Different Exposures in Photoshop


Subscribe to Our Feed Subscribe by Email Follow Us On Twitter Become a Fan

2 Comments

  • Thomas Craig Consulting

    February 16th

    Awesome post thanks, will give these tips a trial run later this evening … would love to see a post on your favorite cutout method. Especially for detailed subjects (hair, etc…)

  • PhotoKaren

    February 18th

    Thank you for explaining dodge and burn in a simple way.
    One photo tutor I had made it seem much more complicated than this.

Leave a Reply

Never Miss a Thing at TPA

Keep up-to-date with tips, resources, and inspiration for photographers novice to pro.
Subscribe to Our Feed Subscribe by Email Follow Us On Twitter Become a Fan

Search

Topics

  • 101
  • Challenge
  • Freelance
  • Inspiration
  • How To's
  • Tips
  • Resources
  • Freebies
  • Updates
  • Photographers
  • Tutorials
  • Tools
  • Gear
  • DIY

Recent Articles

  • How to Paint with Light in a Photograph
  • 35 Examples of Amazing Tilt Shift Photography
  • Photography Tips – Shooting County Fairs
  • The Wix.com Premium Photography Website Giveaway
  • 24 Amazing Photoshop Actions to Help You Achieve a Retro Look
  • Looking Up: A Photographer’s Tribute To Trees
  • 20 Useful Photoshop Actions to Make Your Post Processing Easier
  • Showcase Challenge: A MidSummer’s Night Dream
  • Specialize In: Commercial and Advertising Photography
  • 42 Awe Inspiring Photos of Extreme Weather
  • Get Exposed: User Submitted Showcases
  • 20 Photoshop Lighting Effects Tutorials for Image Enhancement
  • Specialize In: Architectural and Industrial Photography
  • fotoflōt Magnetic Mounting System Giveaway
  • Specialize: Outdoor and Adventure Photography
  • Premium WordPress Themes to Help Your Portfolio or Photoblog
  • $50 Giveaway from Next Day Flyers
  • 30 Adorable Examples of Baby Photography
  • Choosing Areas of Specialization in Digital Photography
  • Field of Dreams – 30 Amazing Photographs to Leave You Inspired
  • Understanding Freelance Photography
  • 30 Inspirational Examples of Fashion Photography
  • 30 Wonderful Photos of Windmills From Around the World
  • Crude Awakening – A Photographic Series by Jane Fulton Alt
  • Helpful Tools for Creating, Sharing and Discovering Lighting Diagrams

TPA Community Portfolio

    GustavoDiego AraújoAstraRed star of the gardenIMG_0544The Red DoorsWay to Kunming (Via Xi'an)Friends

    Share your work here!

Recent Posts

  • How to Paint with Light in a Photograph
  • 35 Examples of Amazing Tilt Shift Photography
  • Photography Tips – Shooting County Fairs
  • The Wix.com Premium Photography Website Giveaway
  • 24 Amazing Photoshop Actions to Help You Achieve a Retro Look

Recent Comments

  • Most of them r fake, tilt shifted in post. Do...
    Angel
  • Awesome photos. Here are two of my attempts: http://gooddaysbetterdays.tumblr.com/post/869710862/somewhere-on-dingle-peninsula-ireland-summer-of http://gooddaysbetterdays.tumblr.com/post/837953418/beach-near-caherdaniel-ireland-summer-of-2010...
    Thomas
  • My attempt using a pic my wife took at the...
    Nunya
  • Here is a great video put together using tilt-shift style...
    Justin

About

The Photo Argus is a resource for photographers novice to advanced. We bring you useful information, inspiration, technique, photographer showcases and more.

Be a Contributor
Do you have a photography technique or tip to share? We would love to here about it. Please feel free to contact us to find out how to become a contributor.

Background Image By - Rob Walker


© Copyright 2010 The Photo Argus