Some people spend years trying to master professional photography techniques, not knowing that a few easy iPhone photography skills are all they need for incredible iPhone photography. While DSLRs and mirrorless cameras still have their advantages, especially as a professional tool, the iPhone, with each new generation, is closing the gap.
In this article, we’ll share eight iPhone photography tips, tricks, and hidden camera features for beginner to intermediate photographers. However, most of the principles we’ve highlighted below go beyond your camera phone and can be used on any camera you use, be it for leisure photography or content creation purposes for your web page.
Article Outline:
- Exposure Settings for iPhone
- Simplicity
- Lock Focus
- Try Low Angles
- Compositional Grid
- Show Depth in Photos
- Burst Mode for Action Shots
- Capture Detail
A big thank you to Pye Jirsa of SLR Lounge for giving us permission to use these photos. See more of his iPhone Tips and Tricks here.
1) Learn to Adjust Your Exposure Settings on the iPhone
Most phone camera apps and the native camera apps on mobile devices facilitate the increase or decrease of exposure settings, just like Mirrorless and DSLR cameras. For the built-in iPhone camera, one can adjust this setting by tapping and holding any part of the screen and dragging your finger either up or down by holding the sun icon to find a suitable exposure setting. However, in some other camera apps, you can manually key in some camera settings such as ISO, Aperture, and shutter speed.
2) Keep Your Photos "Simple" and Clutter-Free
Taking good photos with your iPhone often starts with keeping the pictures you take as simple as possible. Beginners in photography often over complicate their pictures by having too many details in the scene, distracting the viewer. It isn’t easy to create a beautiful composition out of a busy scene.
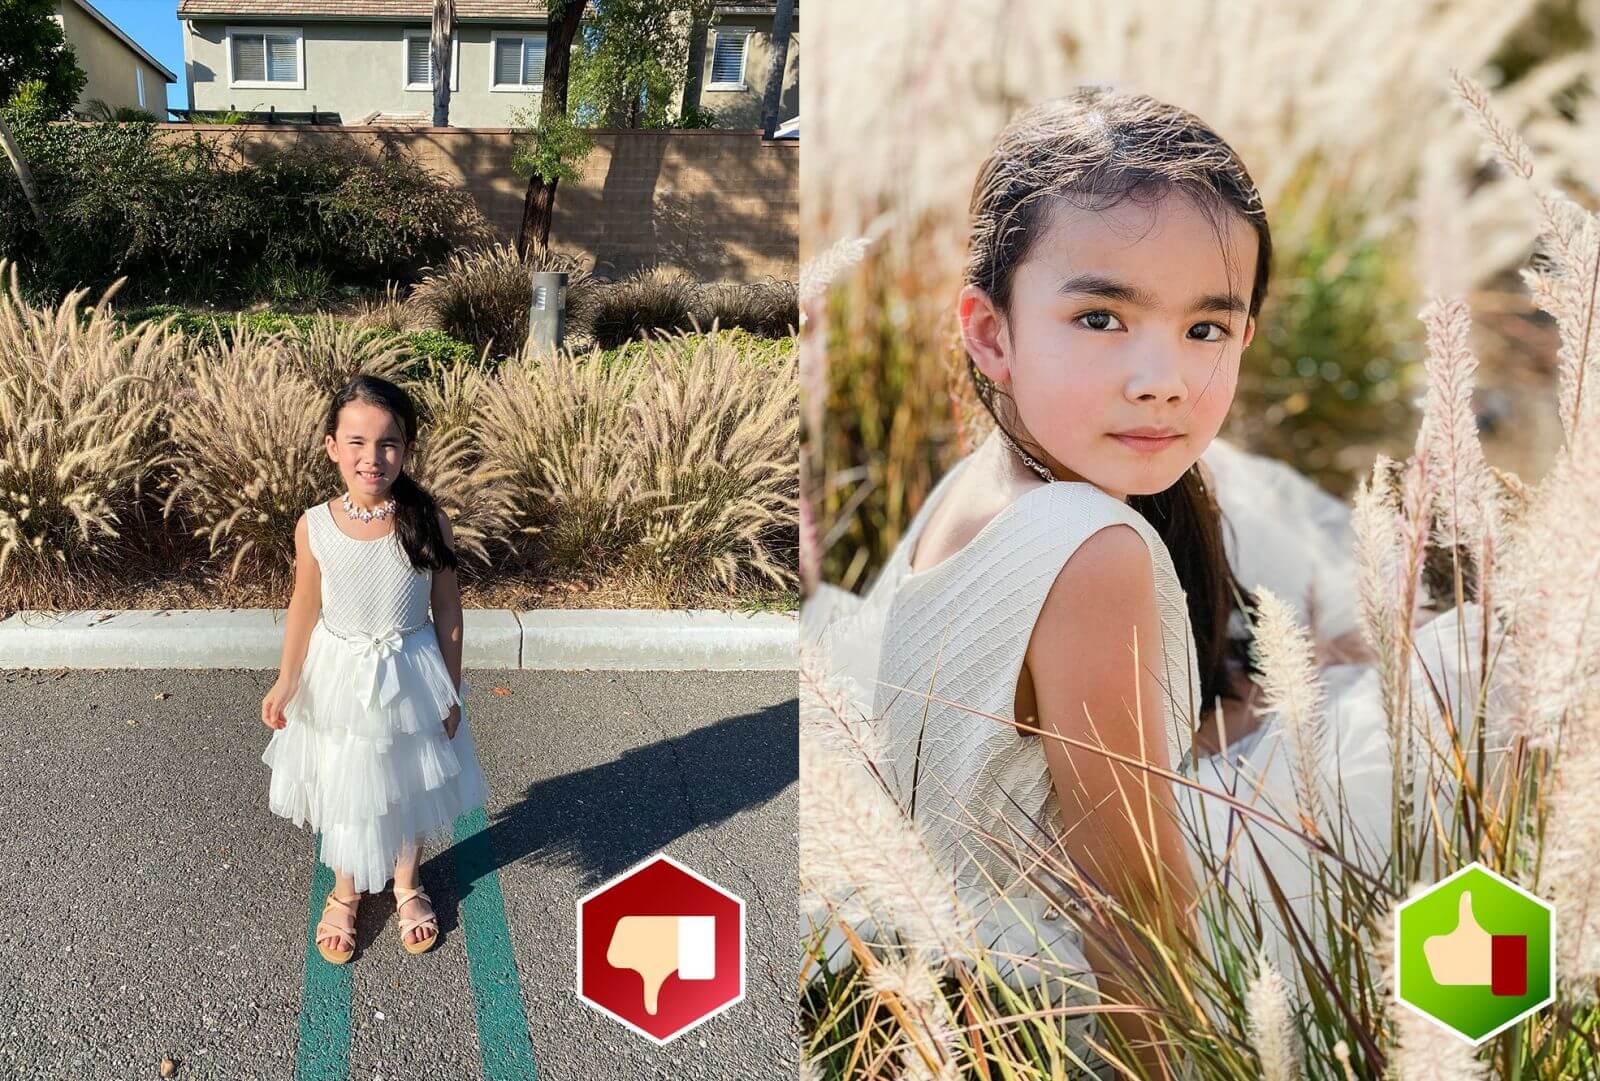
All you need to create a perfect picture is just one interesting subject. In fact, it is way easier to create a strong composition with one subject in the picture as opposed to one with many. You do not have to worry about the empty space left in the picture with only one subject in the frame as it helps the subject pop out even more. This empty space in photography is referred to as negative space.
Before clicking the shutter button, it is also extremely important to scan the scene for any distracting elements. This can be done by changing your viewpoint or moving closer to your subject in order to hide the distracting elements from your photo. Photos with one subject are perfect for sharing on social media platforms such as Instagram and are likely to project better on smaller screens such as smartphones.
3) Lock Focus on Subjects
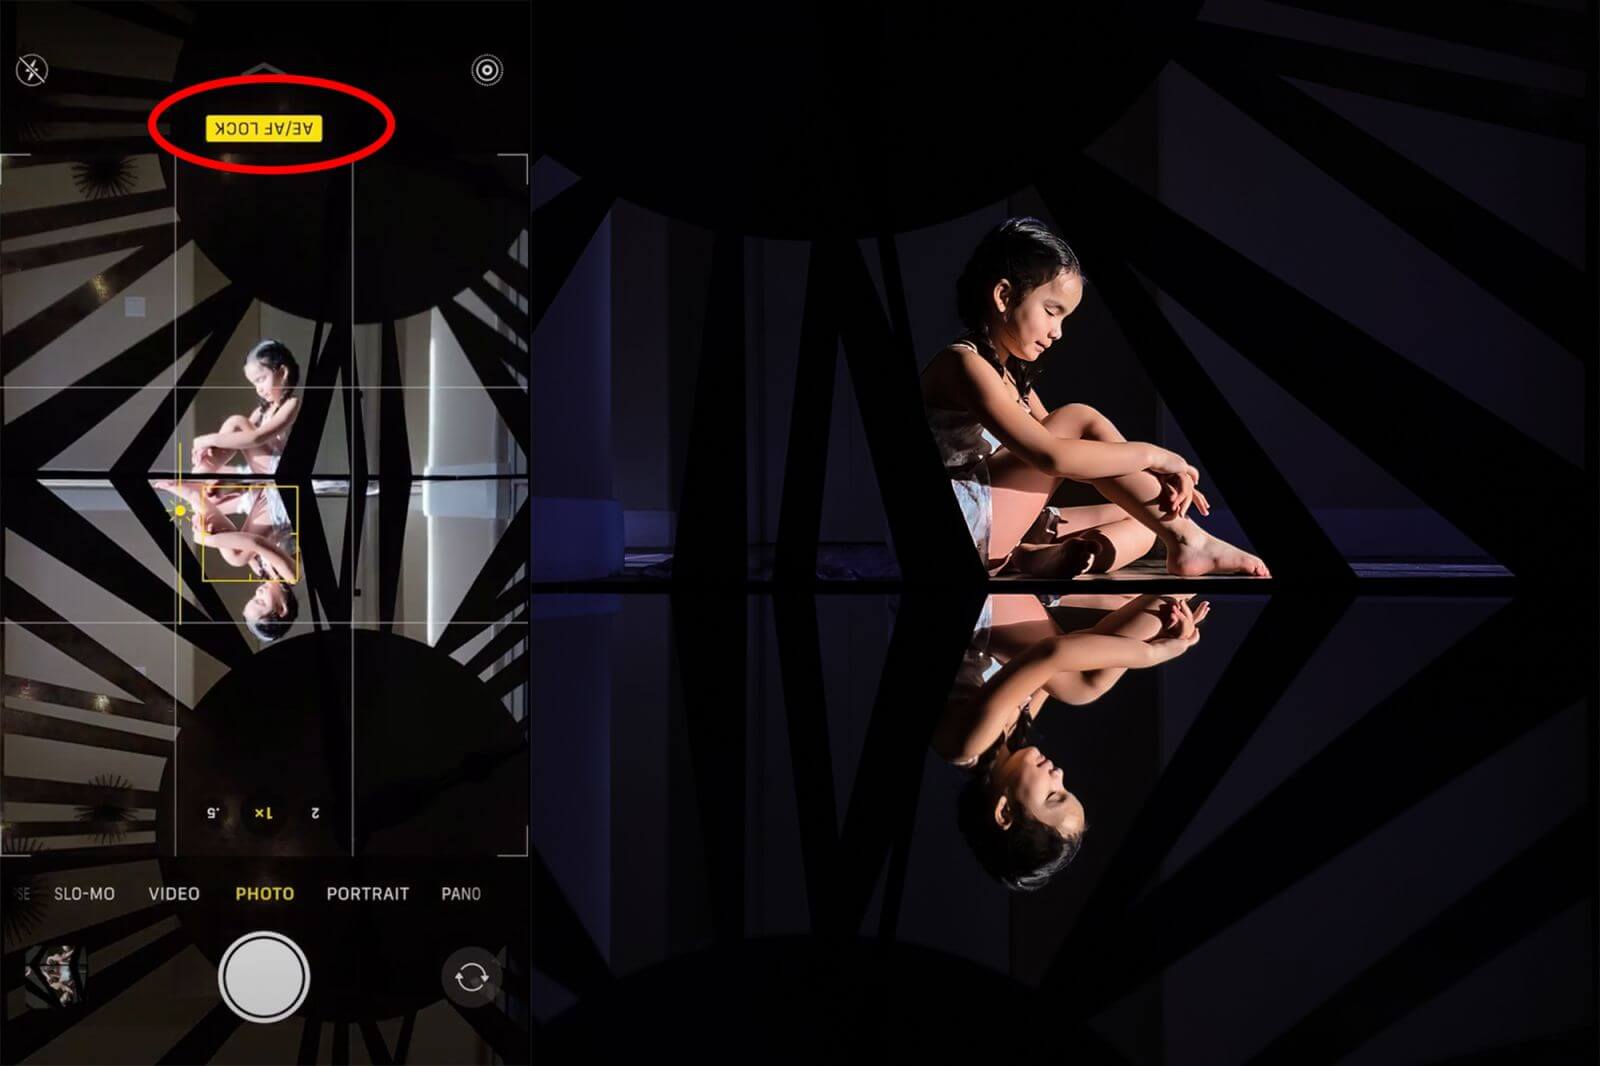
As seen in Creative Photography 101 from SLR Lounge
Locking of focus can be done by holding and pressing down on the area you wish to focus on. A small auto exposure/autofocus (AE/AF) icon will appear just above the area that you have chosen. Doing so will ensure that the subject actively stays in focus even if you move around the scene or shake the camera accidentally. After locking on your subject, you can now move the camera to any position you choose in order to find the best angle and include other objects into the picture without having to find focus all over again.
4) Shoot from a Low Angle
Most people taking photos from their iPhones do so while standing and at chest height simply because it is the most convenient way of taking photographs. Sadly the outcome is basic photos with nothing really standing out. There are more creative techniques out there other than standing and taking pictures, and the outcomes are out of this world. One way of doing this is thinking out of the box and taking photos from a low angle. This allows you to shoot from a different perspective and could be the difference between an average photo and an excellent one.

There are three significant benefits that come with low angle shots. First, photos automatically become more intriguing because viewers see the subject from a new perspective. Secondly, outdoor lower angle shot, more often than not, leaves only the sky in the background, which makes the subject pop even better due to the limited amount of distraction. Finally, low angle photography helps you focus on detailed, interesting foregrounds. Interesting foregrounds may include ripples and water reflections or flowers. The perfect low angle shots come from kneeling or even lying flat on the ground.
5) Use the Compositional Grid
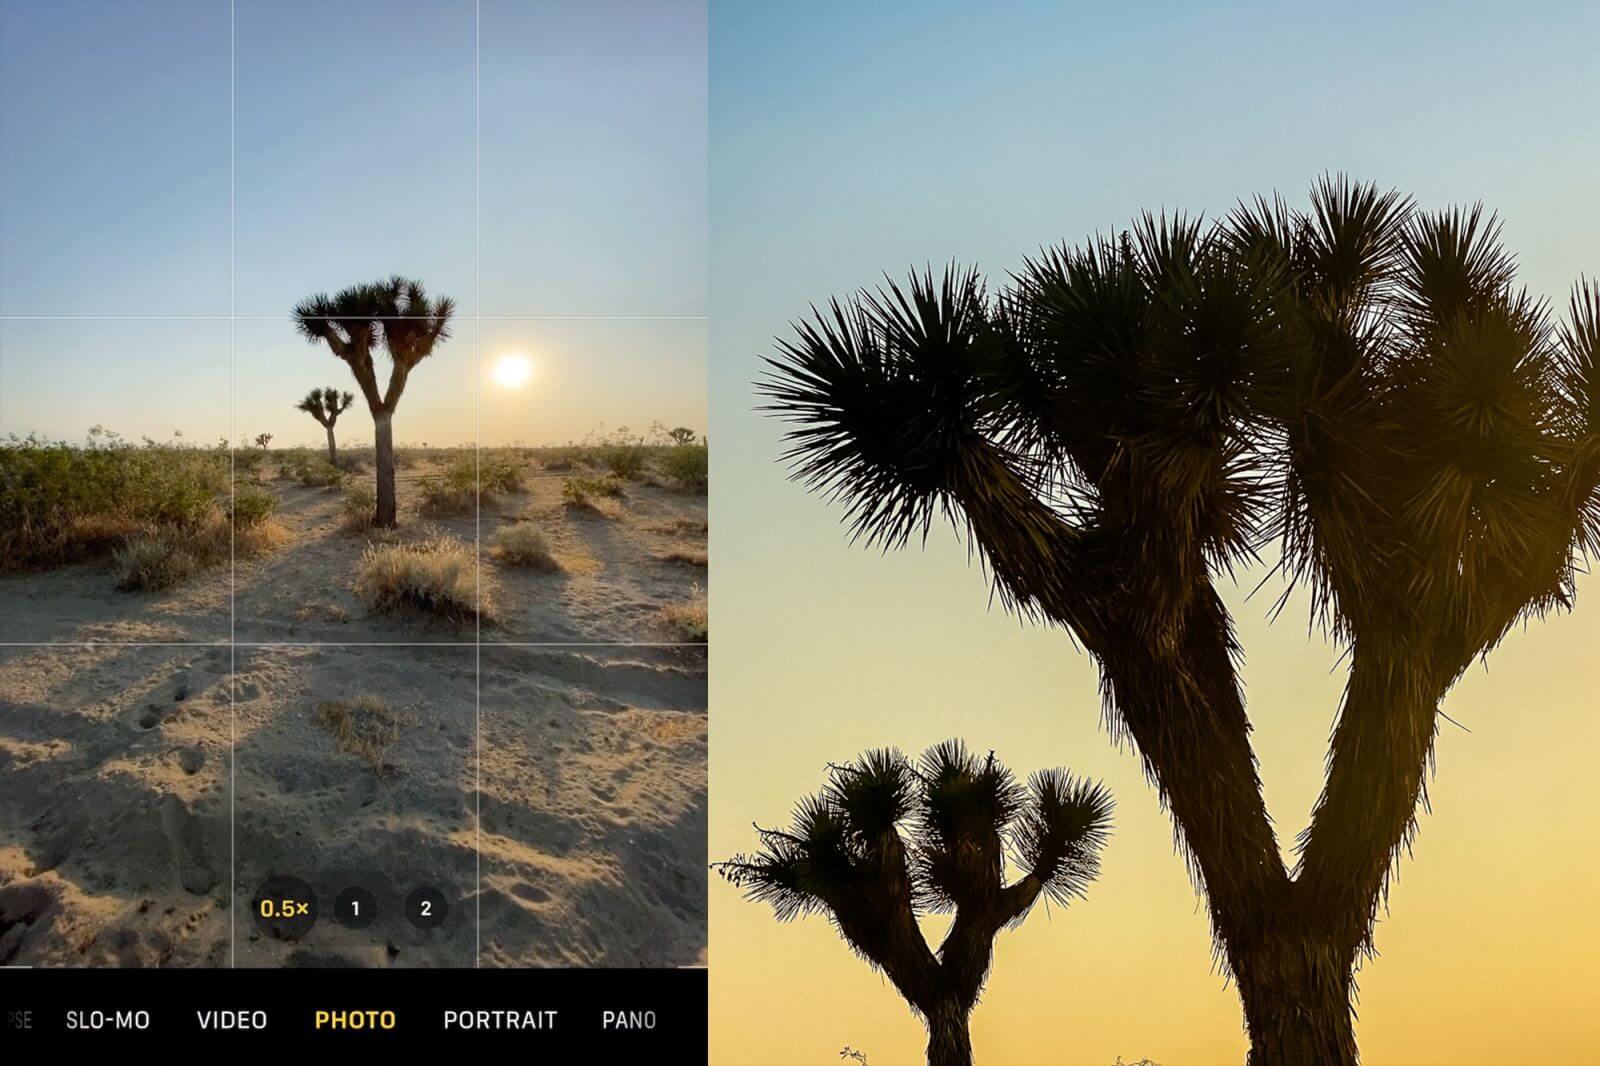
A compositional grid divides the frame into nine equal parts. To switch it on, you will have to select settings on your iPhone home screen and navigate to photos and camera and toggle the grid on. Doing so will result in a compositional grid to appear when you launch the native camera application. This tool will greatly assist you while taking photos by helping you visualize whether you are following the photography rule you intend to like the rule of thirds lines or not. You can also practice and get the hang of other rules such as leading lines or the golden rule.
6) Show Depth in Your Photos
Photographs look ten times better when they have a sense of depth. Depth is essential in landscape photography as it draws the eye of the viewer into the scene. Numerous techniques do exist to help you create depth in your photographs. Leading lines is one of the best techniques to use in your composition. Subjects such as railways, paths, roads, fences, and rivers are good leading lines. If you are at the beach, the ripples and the water’s edge can also act as excellent leading lines. Make sure that the lines move from the foreground all the way to the background. This makes the photo more engaging.
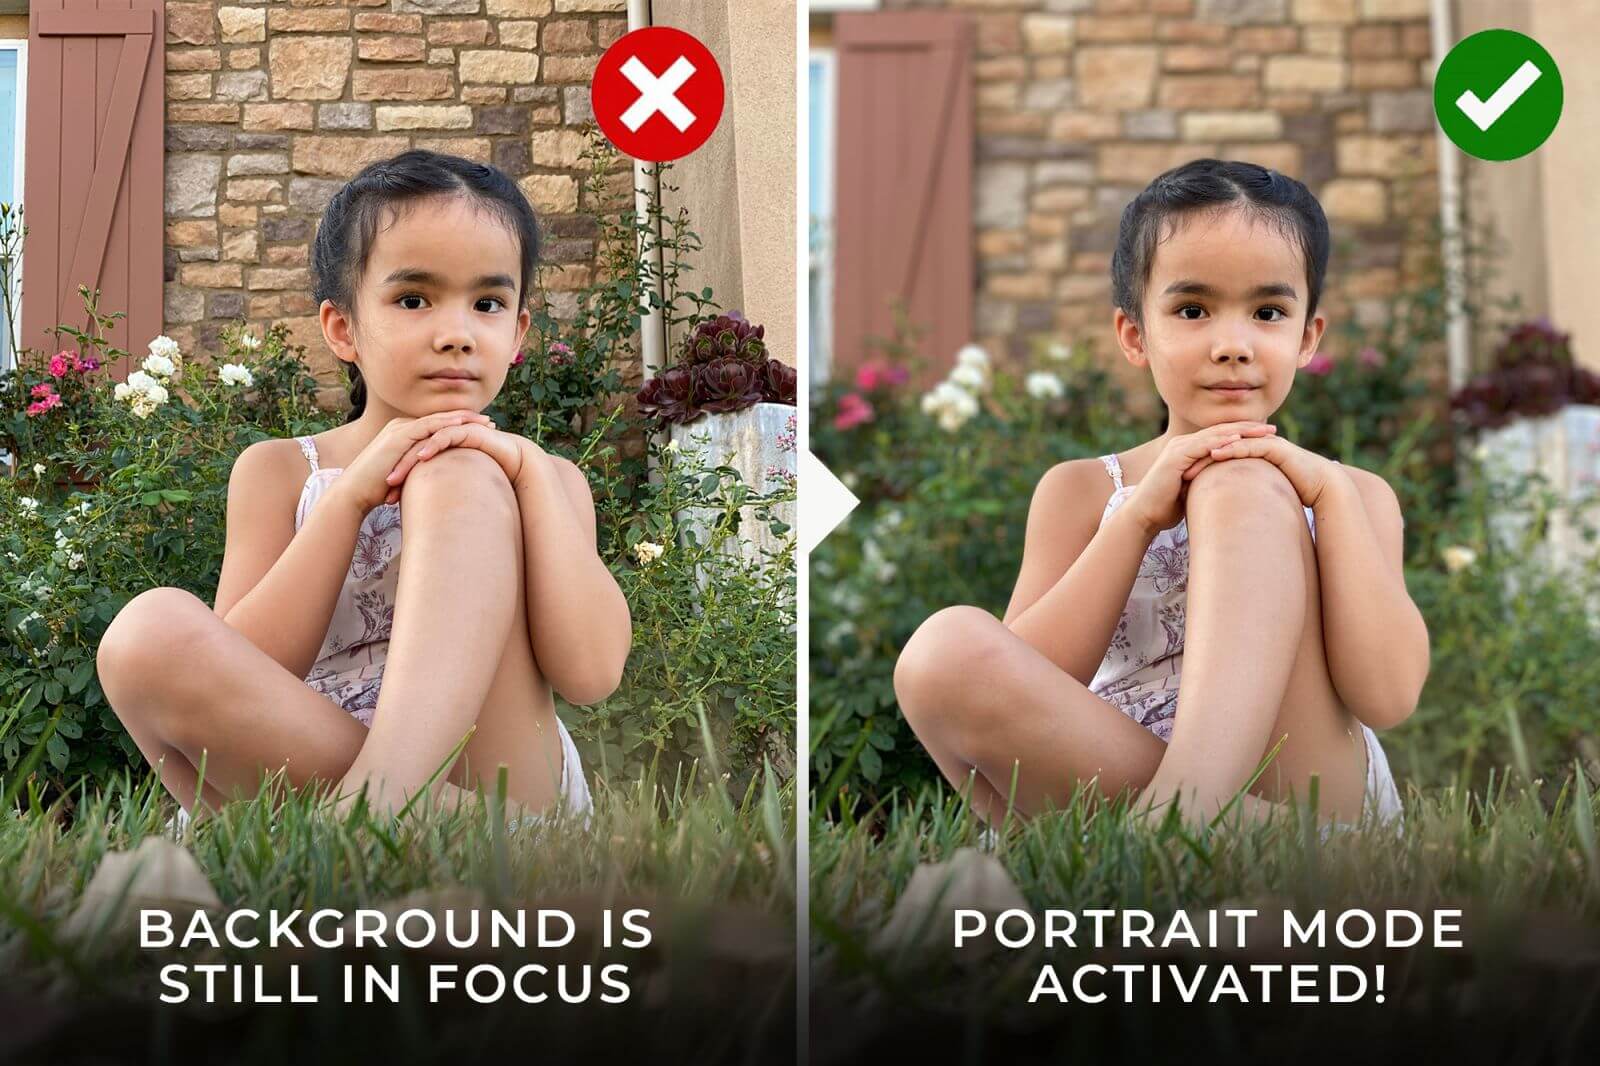
Try using Portrait Mode and/or foreground objects to add depth to your photos
An alternative method of creating depth is using objects such as a leaf, rocks, and other interesting objects and including them in the foreground. If by any chance, you find it hard including objects in the foreground by using this technique, you can try shooting from a low angle. Including subjects to the fore, middle, and background gives your photography a three-dimensional feel, further adding depth.
Thirdly, you can add a sense of depth by using an object in the foreground to frame the scene. You could do this by using window frames, archways, or overhanging tree branches. Taking a photograph through a frame forces the viewer to see the photo through the same frame creating a strong feeling of depth. Mastering this skill will go a long way in improving your iPhone photography skills.
7) Use Burst Mode for Action Shots
Capturing moving subjects can prove to be a daunting task. That is where burst mode comes to help you capture those high-speed moments. To activate burst mode, you have to hold down the shutter button and let the camera do the rest. Burst mode will capture ten frames at one go. This is hugely beneficial as it captures the action at the perfect time. Additionally, you can select the best ones and delete those that you do not need. Burst photography is ideal for sports photography, jumping, and dancing.
8) Capture Close-up Detail
The biggest mistake that most photographers make is not getting close enough to the subject with many details on them. Most end up shooting from a distance leaving out the great details on the objects. Colors, textures, and patterns up close turn an average shot into an incredible photograph. Textured objects like water droplets, flowers, and leaves are excellent subjects for close-up photography. In portrait photography, moving closer to your subject will get you better shots. The main reason for this is because you are able to capture more emotion from their facial features as compared to if you were far away.

Close up photography works wonders on human subjects and pets. Be sure to go down to the level of the subject and take the shot. There is a limitation on how close you can get to the subject. This is because your iPhone camera will not be able to focus and create a clear image. For extreme close up photos, you will need to get an add-on microlens. There are several macro lenses for iPhone cameras, and they include Olloclip and Hitcase. Getting close to your subject can make all the difference.
More Info
For more on iPhone Photography, we recommend the workshop “Creative Photography 101” by SLR Lounge. See the trailer below or click here for more information.
