Achieving a lens vignette in-camera is not always an option. Even then, the effect you were striving for might not turn out the way you had imagined. Unfortunately, you can not manipulate authentic lens vignettes to conform to your specific photo…or can you?
When post processing your image in Photoshop – especially if it is a portrait – adding a custom lens vignette that compliments the highlights and shadows of your photo is an invaluable skill to add to your Photoshop tool belt. Below is a very simple, quick, and entirely customizable way to apply the dramatic atmosphere a lens vignette provides to any photo you choose.
1. A vignette should always be added to your image at the end of the editing process. If you decide to crop your photo differently or alter the colors, the vignette would most definitely get in the way of that.
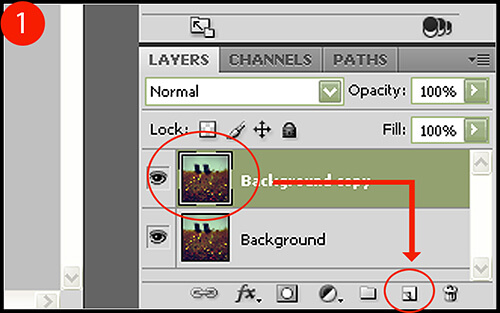
With that in mind, open your image in Photoshop and duplicate the layer by clicking Layer > Duplicate so that you still have your original layer to revert back to if necessary. You can also do this quickly by clicking on your layer thumbnail and drag-and-dropping it over the “add a layer” icon located on your layers palette toolbar (Figure 1).
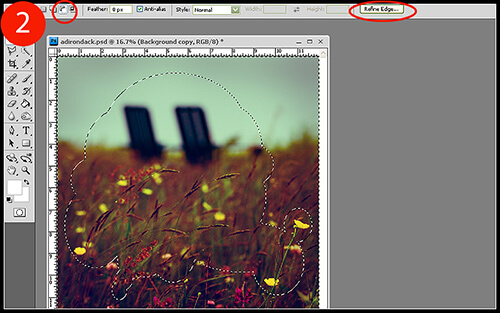
2. With your new layer selected, press CTRL + A to select the entire canvas. Now click on your Oval Marquee selection tool , and with the “subtract from selection” option selected in the toolbar at the top of your screen (Figure 2), start to select – or should I say, deselect – the areas you wish to remain unaffected by the vignette. Most certainly the entire center area should be deselected, but depending on your photo and what elements you want to keep perfectly lighted, expect to have a very uneven and rather odd-looking selection path when you’re finished. The key here is to remember that a lens vignette does not have to be a uniform oval – you can manipulate the perimeter and strength of the vignette any way you choose.
When finished, click on the Refine Edge button located in the top tool bar for the Marquee tool.
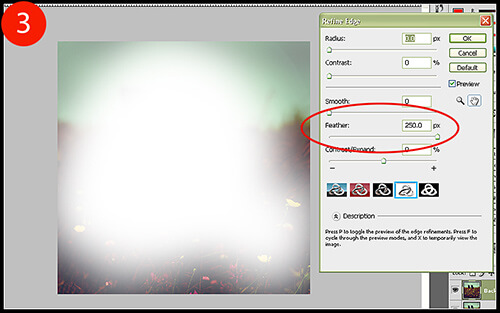
3. Under the Refine Edge window, increase the feathering to create a very gradual and soft selection. For this example, I increased the Feather to 250 for a fully-feathered area. Click OK when finished.
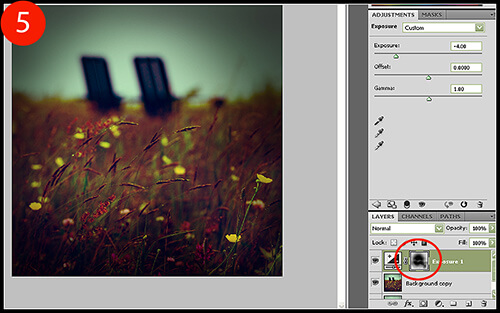
4. We are now going to add an Exposure adjustment layer so that we can decrease the exposure on the areas we just selected (which is why we were using the “subtract from selection” marquee tool). Click Layer > New Adjustment Layer > Exposure, or just click on the Exposure icon in your adjustment layer palette.
Decrease the exposure enough so that you cast a dramatic and pleasing lens vignette. For this example, I underexposed the selected areas by four full stops.
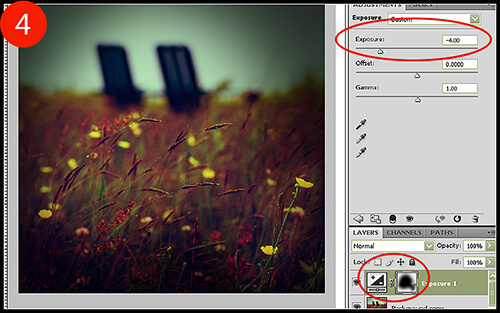
5. To further our vignette customization, you can utilize the layer mask that was applied to your Exposure adjustment layer automatically. To either remove or add the vignette to areas in your photo, click on your Brush tool and set the foreground color to black for removal, or to white for addition. With a soft brush (one with 0% Hardness) set to an Opacity level of around 10% to start, begin to brush the areas you wish to affect (Figure 5). In this example, I removed some vignetting from the singular yellow flower in the bottom right-hand corner of the photo, and also from the sky as it seemed to be too sharp of a transition originally.
Shooting conditions can be very fast-paced and stressful, and you most certainly have enough techniques to remember on the fly without having to perfect a lens vignette that you’re essentially stuck with. A fully customizable – and removable – lens vignette is the perfect finishing touch that adds a sense of drama to your final image.

