In the technologically advanced world we live, emphasis is often given to new technologies and photography is certainly no different. Educational photography literature be in online or in books often revolves around capturing and editing of images, but little is discussed in the way of printing these images. Unbeknownst to many, printing technology in the shape of inks and photographic papers has also made great strides over the years, though the lack of readily available information often makes it difficult for individuals to take advantage of these.
You might think that printing is an aspect of photography that is slowly fading away, but nothing can be further from the truth. More images than ever are been printed due to the wide adoption of digital cameras in various products and the fact that many perceive a printed image more special than a digital one as physically holding an image creates a special connection with the print. It is a shame if having worked so hard to capture that perfect image, you are let down during the printing stage. In this guide to digital photographic papers we will discuss the various aspects of printing your work.
The Difference Between Normal Paper and Photo Paper
People are often under the incorrect impression that the caliper of the paper i.e. its thickness is an indication of whether or not it can retain a high quality image without waving due to excess ink or bleeding over. Normal printer paper be it a thin 80gsm or even thick 120gsm will never be able to accommodate a high quality image simply because it lacks the required chemical coating to absorb the high quantities of ink.
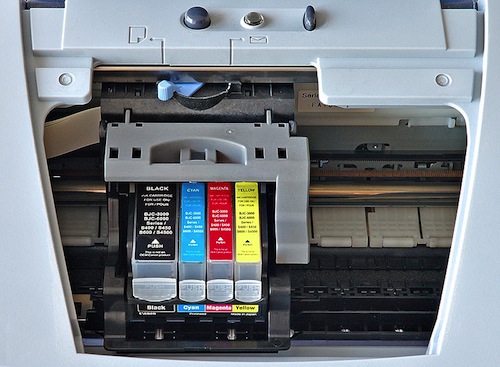
Inkjet printers use liquid ink dispersed by means of a fine jet (from which comes Ink-Jet) to spread the ink evenly and accurately. In the case of plain printing paper, the lack of a chemical coating causes the paper to quickly saturate with ink. The ink will then bleed outwards and to the other side, quickly smudge when held and worst of all, the print definition and colours will prove highly inaccurate and will quickly fade in a matter of weeks. Therefore, photo paper varies from plain paper in that it contains a chemical coating often referred to as a receiving layer designed to hold the ink and ensure that colours and sub-tones are as close to reality as possible.
Inkjet printer use four basic colours to achieve this result of CMYK, however specialised printers can now support up to nine different colours resulting on outstanding results.
By André Karwath aka Aka (Own work) [CC-BY-SA-2.5 (http://creativecommons.org/licenses/by-sa/2.5)\], via Wikimedia Commons
The Types of Inkjet Photo Papers Receiving Layers
To the dismay of many, the brand or manufacturer of the paper does not equal to quality in photographic papers. Each brand, be it Canon, Epson or even more specialised niche manufacturers often produce a line of budget and a line of premium range photo papers. The difference lies in the type of Inkjet coating that is used on the paper. The two common alternatives are Cast Coated and Micropores or Nanopores.
Cast Coated Receiving Layer - Cast coated is an old and trusted technology in which the receiving chemical layer is applied on the surface of the paper and solidifies when the paper goes through hot metal rollers. The result is a glossy finish (never satin or matt), which can accommodate either dye based or pigment inks. It is a cheaper type of coating to produce and often used in budget photographic papers. The manner in which the ink ‘sits’ on the surface means it is more susceptible to smearing when held, particularly in the case of heavy pigment inks.
Micropores or Nanopores Receiving Layer – These are newer technologies, which are often used in the manufacturing of professional grade photographic papers. In this case, the receiving layer chemical contains microscopic pores that accommodate the ink as opposed to allowing the ink to simply sit on the surface such as in the case of coat coated receiving layer. It means that the image is safe from smearing and your options for paper finish are not limited to glossy alone. The micropores and nanopores technology produces more durable results with better archival properties and better colour definition.
When looking at various options for your printing requirements, look closely at the type of receiving layer that is used rather than simply the ‘brand’. In fact, there are plenty of niche manufactures such as INNOVA, Hahnemuhle and ILFORD which offer photographic papers with universal compatibility so owning a certain brand’s printer does not limit you to its range of photographic papers. Instead look at the coating and the required weight.
_Top feature image by Horia Varlan_square
Photo Paper Density and Weight
There is often a considerable confusing when it comes to paperweight or GSM as many refer to it. In the past it was widely considered that heavyweight photographic paper would equal superior results. We now know that the receiving layer coating will influence the quality of the print more than any other aspect. To illustrate the point, a 260gsm cast coated paper will not offer superior results to a 200gsm micro porous and nano-porous paper. GSM does matter in certain cases for the perceived value of the print, as it feels thicker when held.
Therefore if your print is to be given away you will often source a combination of GSM and suitable receiving layer.
Photo Paper Finish
The last consideration is really a subjective one as it is based on individual taste. Photo paper finish is measured on a scale of glossiness from the highest such as full glossy finish the least such as matt finish.
Glossy – The highest sheen and glare finish is glossy. When viewed directly, the sheen allows viewing small details in the images. When viewed from the side and under certain light conditions, the image will not be visible because of the reflection off the surface and the viewing angle might need to be adjusted.
Satin – You may come across satin as Semi-Gloss finish. Different manufactures use one of the two terms to describe the same finish. Satin contains less sheen than glossy finish and viewing angle is improved as a result.
Pearl and Lustre – The two are variations of satin, distinguished by the level of sheen in the coating. Pearl is a satin finish with a higher level of glossiness, while Lustre is another variation with a lower level of glossiness.
Matte – Unlike glossy, satin, pearl and lustre that include sheen to some degree, matte has no glare. This finish is mostly used for reports, booklets and presentations where there is no “keepsake” value to the image.
Enjoy your printing.
