One of the most beautiful aspects of black and white photography is having the ability to create images with intense grain or noise that gives your photo a dark, gritty, and highly texturized effect. However, we do not always seize the opportunity to use this tool in-camera. Did you forget to bump up your ISO setting again? Or perhaps you found an old image that would look stunning with some high-contrast grain added to the surface? Starting now, there are no more excuses for you since you’ve just discovered a unique and completely reversible way to add authentic-looking grain to your photographs.
1. It would be best to add this effect towards the end of your editing process, as it would really disrupt your workflow to add a grain effect then decide to change the orientation or crop.
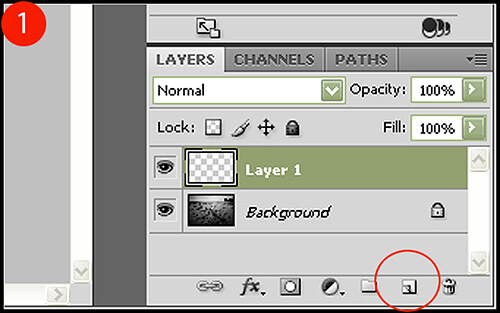
With your edited image open, create a new layer by clicking on the appropriate icon in your layers palette toolbar (Figure 1).
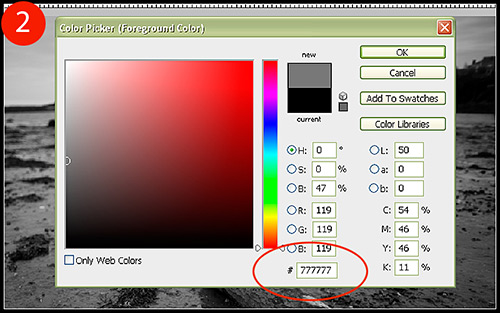
2. Select your Paint Bucket tool and set the foreground color to a neutral gray by typing “777777” into the web color box (Figure 2). Now click anywhere on your image to completely submerse your new layer with that color.
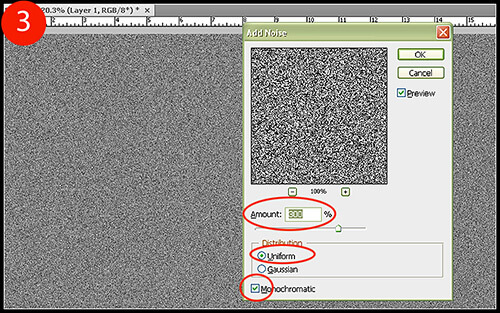
3. Click Filter > Noise > Add Noise so that we can add our grainy texture to your new layer. Make sure the Monochromatic box is ticked so that the noise added is in grayscale, and select Uniform as the Distribution type. To finish, set your Amount to 300% (Figure 3) and click OK to add this effect.
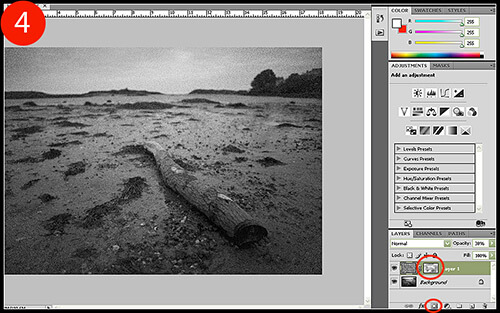
4. Obviously, we can not see our base image. Let’s correct this by lowering the layer opacity to 30% so we can see what we are working with.
To further our film grain customization, we are going to mask out parts of the film grain layer so that the effect is not so uniform. First, add a masking layer by clicking on the “add a layer mask” button in your layers palette toolbar (Figure 4). To slightly remove the grain from areas in your photo, click on your Brush tool and set the foreground color to black. With a soft brush (one with 0% Hardness) set to an Opacity level of around 10% to start, begin to brush areas of interest you wish to become more apparent. In this example, I removed some grain from the log and seaweed in the foreground, and a little bit from the horizon.
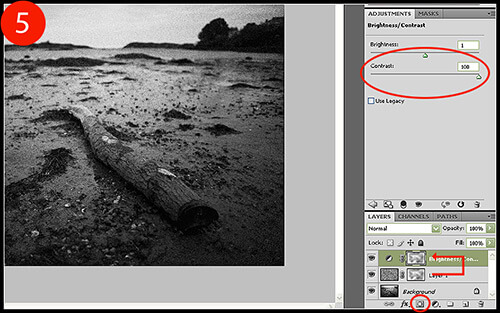
5. While the grain is starting to come together nicely, this layer has really lowered the contrast of our photo. To bump this back up, add a new Brightness/Contrast adjustment layer by either clicking on the appropriate icon in your adjustment palette, or by selecting the “create new adjustment layer” icon on your layers palette toolbar (Figure 5). Once the new adjustment layer has been added, increase your Contrast to 100 so that the gray haze caused by our grain layer is eliminated.
To finish this step, click on the layer mask for your film grain layer and, while holding down the ALT key, click-and-drag the layer mask and drop it onto the adjustment layer mask to replace it. A window will pop up asking if you want to replace the layer mask; click OK to apply the change.
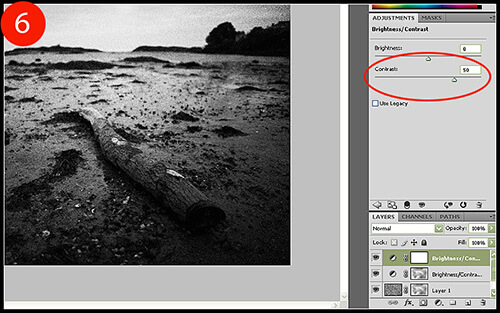
6. The colors still look a bit muted and not quite at the gritty level we’re aiming for. One last time, we are going to create another Brightness/Contrast adjustment layer as described in Step 5. However, we are only going to increase our Contrast to 50, which will add just enough extra contrast to obtain the look we want (Figure 6). You do not need to clone the layer mask again for this step.
Having optional film grain is quite the luxury, although I think us digital photographers have become quite accustomed to post process miracles by now. With this tutorial in your digital arsenal, you can take any black and white photo and bless it with a gritty, grainy texture usually only seen in film photography.
