When viewing your image in post process, you may notice that some areas are perfectly exposed while others fall outside their ideal exposure. Since we can not expose every part of a photo perfectly, we have the Photoshop Dodge and Burn tools at our disposal which help us selectively correct the exposure in the form of a brush tool.
The Dodge tool is what you use to increase the exposure on sections of your photo that you draw on (make them lighter), while the Burn tool will the decrease exposure (darken an image). In Photoshop, you can choose to have either the highlights, mid tones, or shadows of an image dodged or burned.
For example, if you took a shot of the ocean with the sunlight reflecting off of the ripples in the water and you would like to decrease the brightness of the reflections, you would select the Burn Tool to decrease exposure. Then, you’d select Highlights so that it only decreases the exposure on the bright reflections.
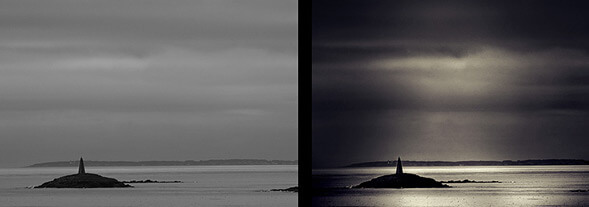
The image I chose for this example is one that is very flat in tonal range, as you can clearly see. It was taken during overcast lighting, which produced an unremarkable gray sky and water. Using the Dodge and Burn tools, we are going to selectively increase the tonal range of the image, as well as the overall interest and depth.
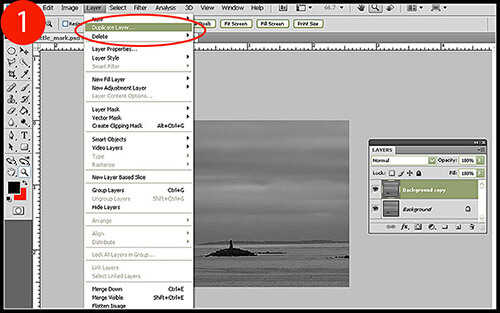
1. The first thing to do is to duplicate our base layer so that we have the original image to revert to if necessary. Click Layer > Duplicate Layer to add an additional layer (Figure 1).
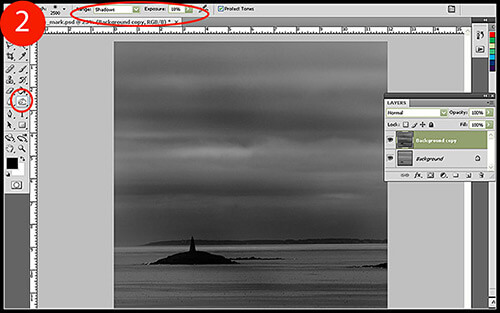
2. Select your Burn tool and right-click to bring up the Burn tool brush menu. Set the Hardness level to 0% and select a brush size appropriate for the area you want to affect. Now go to the Burn tool menu at the top of your screen and set the Range to Shadows, as we only want to burn the darker tones initially to increase the tonal range of the image. Start with an Exposure setting of 10%, and then readjust when necessary.
Begin to brush over the areas you want to darken and continue to pass over them until the desired effect has been reached. Notice how the highlights essentially stay unaffected, while the darker tones are burned quite noticeably (Figure 2).
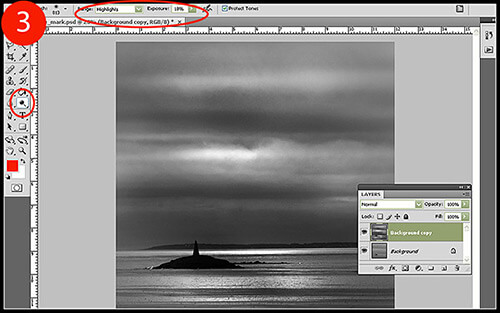
3. Right-click on your Burn tool to reveal the Dodge tool, then select it. Set the Dodge tool brush to the same parameters as you did to your Burn tool : a Hardness level of 0% and a brush size that will fit the area you intend to lighten. Return to the top of your screen and adjust the Dodge tool menu so that the Range is set to Highlights, so that we are only lightening the light tones of the image. As we did previously, the Exposure should be set to 10% initially, then adjusted depending on how strongly the Dodge tool affects your photo.
When brushing over the areas you wish to lighten, take care not to overexpose – or blow out – the highlights, as that can become highly distracting to those who view your image.
With a little more precision dodging and burning, and a few adjustment layers, the final result is much more dramatic than the original:
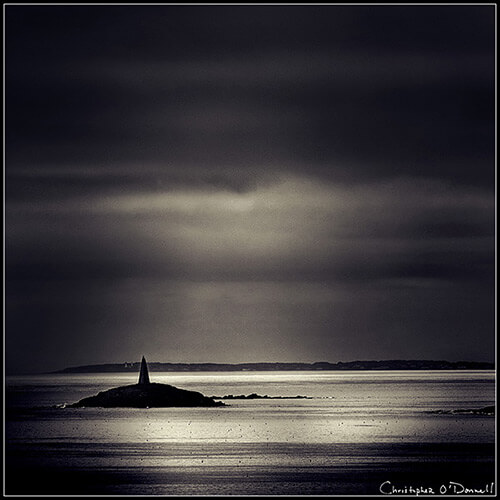
The Dodge and Burn Tools are incredibly versatile, and with the right combinations of opacity and range, you can dramatically change the lighting effects and overall exposure of the entire image. The next time your image comes out with flat, uninteresting lighting and tones, try using a complimentary combination of the Dodge and Burn tools and see what you can come up with.
